Wheel Throwing Techniques: From Centered Clay to Finished Form
Wheel throwing is often the first image that comes to mind when people think of pottery. A ball of clay spinning on a wheel, gradually transformed into a bowl, cup, or vase by steady hands — it looks effortless when done by an experienced potter, yet the underlying skill set takes months of deliberate practice to develop.
This guide breaks down the process into discrete stages. Each one builds on the previous, so resist the temptation to skip ahead. Consistent repetition at each phase is more productive than rushing toward a finished piece.
Essential Tools and Setup
Before sitting down at the wheel, gather a few items:
- Potter's wheel — electric wheels with variable speed (0-300 RPM) are standard for beginners. Brent and Shimpo are widely used brands.
- Throwing clay — a mid-range stoneware body with some grog (fired clay particles) offers forgiveness. Look for bodies rated for cone 6 (approximately 1222 C).
- Water bucket and sponge — you need lubrication between your hands and the clay, but too much water weakens the walls.
- Wire tool — for cutting finished pieces from the wheel head.
- Wooden rib and metal rib — for smoothing and shaping exterior surfaces.
- Needle tool — for trimming uneven rims and checking wall thickness.
Position the wheel at a comfortable height. Your elbows should be roughly level with the wheel head. Many potters brace their arms against their body or the splash pan for stability — without this anchor, your movements will be inconsistent.
Step 1: Wedging the Clay
Wedging is the preparatory kneading that homogenizes clay consistency and removes trapped air. Two common methods exist:
- Ram's head wedging — press the clay forward with the heel of your palm, fold it back, and repeat. The clay should develop a shape resembling a ram's head in profile.
- Spiral wedging — a Japanese technique (kikumomi) where you rotate the clay mass with one hand while pressing with the other, creating a spiral shell pattern. This is more efficient for large amounts.
Aim for 50-100 compressions. The clay should feel uniform — no hard spots, no sticky patches. Under-wedged clay is the root cause of many throwing failures, particularly S-cracks on the base of finished pieces.
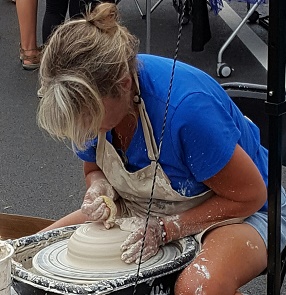
Step 2: Centering
Centering is the most critical — and most frustrating — skill for beginners. The goal: the clay mass must spin perfectly on axis, with no wobble.
Slap the clay firmly onto a dry wheel head, slightly off-center. Start the wheel at medium-high speed. With wet hands, enclose the clay mass and push inward with both hands simultaneously. Use your body weight, not just arm strength. Brace your elbows on your torso or the splash pan.
The classic centering sequence:
- Cone up — push inward with both hands to force the clay into a tall cone. This aligns the clay particles vertically.
- Push down — with one hand on top and one bracing the side, press the cone back into a low dome.
- Repeat 2-3 times. Each cycle refines the center.
A common test: rest one finger lightly on the spinning clay. If it vibrates, the clay is still off-center. If it rides smoothly, proceed to the next step.
Step 3: Opening
With the clay centered into a low dome, push your thumbs (or fingers) straight down into the center. Stop about 1 cm from the wheel head — this becomes the base of your piece. The opening should be directly on center; if it drifts, the walls will be uneven.
Widen the opening by pulling outward from the center. Use a sponge to remove water from the interior — standing water in the base softens the clay and causes collapse.
Step 4: Pulling Walls
This is where the vessel takes shape. Place your inside hand (fingers) against the interior floor near the base, and your outside hand against the exterior at the same height. Squeeze gently and draw both hands upward in a slow, steady motion.
Key principles:
- Speed matching — slow the wheel as walls get taller. Thin walls at high speed will flare out or collapse.
- Even pressure — the inside and outside fingers should press with equal force. More pressure inside pushes the wall outward; more outside compresses it inward.
- Consistent thickness — aim for 5-7 mm walls on a beginner piece. Use a needle tool to check by piercing the wall (patch the hole with a wet finger).
- Multiple pulls — three to four pulls typically suffice for a small bowl. Each pull should thin and extend the wall further.
Step 5: Shaping and Finishing
Once the walls are pulled to the desired height, use a wooden rib against the exterior to refine the profile. A metal rib removes spiral marks and compresses the surface, improving the clay's structural integrity.
For the rim, wet a small piece of chamois leather and hold it over the top edge while the wheel turns slowly. This creates a smooth, rounded lip.
Cut the piece from the wheel head using a wire tool. Hold the wire taut against the surface and pull it toward you in one smooth motion. If the piece sticks, flood the base with water and try again.
Common Mistakes and Fixes
- Clay wobbling on the wheel — insufficient centering. Go back to cone-up, push-down cycles.
- Walls collapsing — too much water, too-thin walls, or too-fast wheel speed. Reduce water use and slow the wheel for pulling.
- S-cracks on the base — uneven compression during opening, or drafts drying the base unevenly. Compress the base firmly with a rib before pulling walls.
- Uneven thickness — off-center opening. Practice opening drills separately before attempting full pieces.
"Centering is not about force — it is about finding the axis. The clay wants to be centered; your job is to stop fighting it." — Adapted from The Potter's Bible by Marylin Scott
After Throwing: Trimming
After the piece reaches leather-hard stage (firm but still carveable, usually 12-24 hours), it returns to the wheel inverted for trimming. This process refines the foot ring and removes excess clay from the base.
Secure the inverted piece with small wads of clay (tap-and-center method) or use a Griffin grip. Trim with a loop tool at medium speed, removing thin ribbons of clay until the base weight matches the walls.
Trimming is where many beginners discover they left too much clay in the base during throwing. Over time, you develop a feel for appropriate base thickness while still on the wheel.


